Do you go to the salon every week to get your nails painted? Not suitable? Well, DIY nail painting can be extremely challenging, sometimes leaving us clueless about how to fix things. Sounds similar? Then, you must know these simple nail polish hacks to make nail painting a breeze! Check them out: (1) (2) (3)
Get Your Nails Ready
Ensuring your nails are free of invisible oils is crucial for enduring nail polish. Optimal preparation involves eliminating these oils by washing your nails with a paper towel soaked in white vinegar. This process results in clean, dry, and paint-ready nails, providing an ideal canvas for your chosen nail color.
Apply Thinner Coats
Avoid applying a thick layer of nail polish, as it tends to dry superficially without complete drying. Opt for multiple thinner coats, allowing each layer to dry between applications. This approach ensures a more even and thoroughly dried nail polish finish.
Avoid Over Polishing
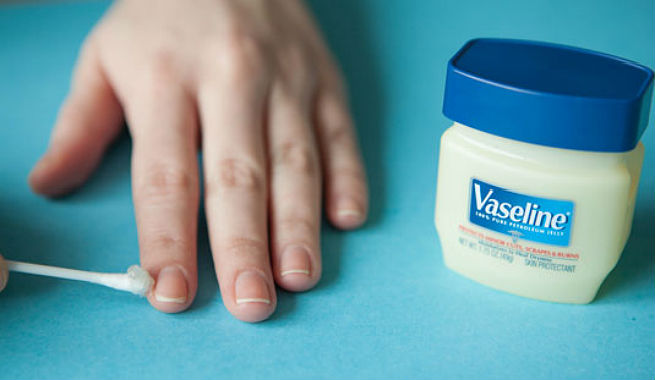
While removing excess polish around your nails is simple, here’s a handy trick to prevent it. Apply a layer of petroleum jelly to the edges of your nails, ensuring no color adheres to your cuticles or skin. This helps achieve a cleaner and more precise nail polish application.
Vanish Those Errors
Errors around the edges of nails during painting are pretty standard. You only need a non-usable eyeliner brush or an old eyebrow makeup brush, which usually has stiff-angled points. Just dip it into your polish and clean up the mess quickly and precisely.
Dry It Faster
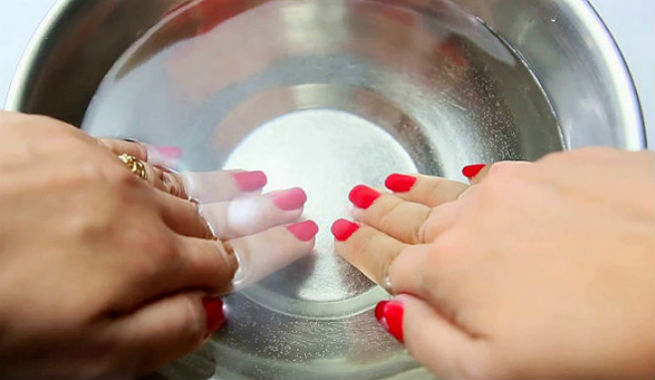
Drying the nail paint is the most challenging part of the job. Sitting under the fan can work, but you may develop bubbles in your beautiful nail paints. Instead, dip them in a bowl of ice-cold water and wait for 30 seconds. You can also apply quick-dry drops or spray to your painted nails to prevent the polish from smudging and drying faster. Spraying your nails with hair or cooking spray will strengthen your top coats and avert chipping.
Make It Stay Longer
When making a nail paint stay longer, a proper base coat is considered a key. Apply a ‘rubberized’ base coat, which can hold on to the polish firmly with the help of its rubber texture and make it long-lasting.
Design As You Wish
A simple scotch or adhesive tape can give you some of the most incredible nail art ideas. Cut the tape into thin, long strips or make different patterns. You may use a few paper hole reinforcers for a half-moon French mani. Designing your nails was never so easy!
Going Ombre Is Easy
Ombre or ‘gradient of color’ is one of the latest nail trends that seem challenging but easy when you know the trick. You can create it by mixing a white polish with your favorite nail paint and increasing or decreasing the amount of white as you wish to go lighter or darker. You can also try blending two shades and applying the liquid to your nails with a sponge.
Turn Neon Brighter
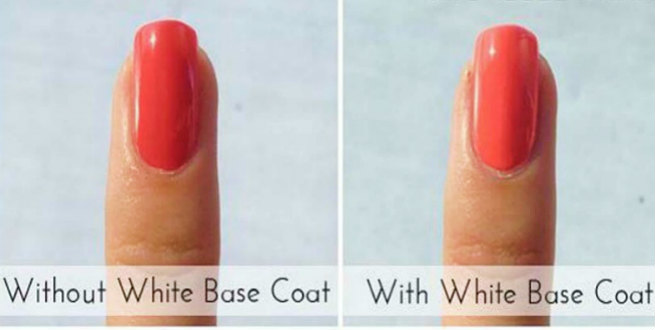
Neon hues are bright enough to make our nails look attractive. But what if you want to make it pop even more? After applying the base coat, coat your nails with a white polish, and then apply the paint as usual.
Say’ NO’ To Bubbles
Bubbles in nail colors are transferred to our nails during application, ruining our polish. When we shake it too much, it often generates inside the nail paint bottles. Hold it between your palms and roll it from side to side to prevent bubble formation.
Prevent Polish Dry-Out
Too much polish stuck to the opening of the bottle? It will dry out your nail color rapidly as the cap will not be closed properly, allowing air to enter the bottle. Soak a tissue paper in acetone remover and wipe the stuck polish off the bottle.
No Stain, Please!
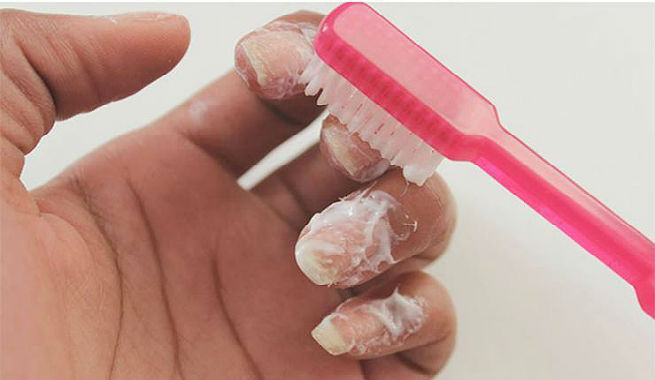
We all get that pinkish/orange tinge after taking dark colors off our nails, right? Please get rid of it instantly by rubbing or brushing your nails with a soft toothbrush and a teeth whitener/toothpaste for a few minutes. Alternatively, dip your stained nails in a hot water solution of baking soda and hydrogen peroxide for a minute or so.
Fix Chipped Nail Paints
If you have no time to repair your chipped nail paint, fix it instantly with a glitter polish. Either follow a uniform pattern or apply multiple coats of different strengths to cover the issue with a faded effect.
Get Your Matte Top Coat
Using a DIY method, you can turn your glossy nail paint into a matte one. Prepare your matte topcoat at home by mixing a little cornstarch with a clear polish and applying it over your glossy nail paint. You’re done!
Also Read – 9 Tricks To Remove Your Nail Polish Without Using Acetone
Summary
Skip the weekly salon visits and master the art of DIY nail painting with these simple hacks. Start by prepping your nails with white vinegar for a clean canvas. Opt for thinner coats to ensure proper drying and prevent polish from sticking to cuticles by applying petroleum jelly. Fix errors with an old eyeliner or eyebrow brush and expedite drying by dipping nails in ice-cold water or using quick-dry drops. Enhance longevity with a rubberized base coat, and get creative with scotch tape for unique nail art—experiment with ombre blending shades and making neon colors pop by applying a white base coat. Avoid bubbles by rolling, not shaking, nail polish bottles. Prevent polish dry-out by wiping excess from the bottle’s opening with acetone. Say goodbye to post-removal stains by brushing your nails with a teeth whitener or toothpaste. Instantly fix chipped polish with glitter and turn glossy finishes matte by mixing cornstarch with clear polish. DIY your way to flawless nails!


